最近重新阅读了一下 YYModel ,做下一些笔记
前置知识 Runtime中的Objc_Object 在Objective-C中,Runtime关于对象的源码如下:
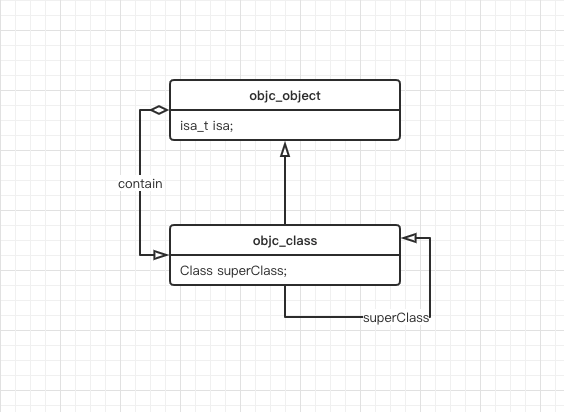
1
2
3
4
5
6
7
8
9
10
11
12
13
typedef struct objc_object *id ;typedef struct objc_class *Class;struct objc_object { Class isa; }; struct objc_class : objc_object { Class superclass; cache_t cache; class_data_bits_t bits; }
由源码可以知道,OC的底层实现是runtime,在runtime这一层,对象被定义为objc_object 结构体,类被定义为了objc_class 结构体。而objc_class 继承于objc_object, 因此,类可以看做是一类特殊的对象 。
再回头看一下objc_object和objc_class 的定义,所以就是一个互相包含关系,如下图
Runtime中的 isa 然后放上一张网图
图中实线是 super_class指针,虚线是isa指针。
Root class (class)其实就是NSObject,NSObject是没有超类的,所以Root class(class)的superclass指向nil。
每个Class都有一个isa指针指向唯一的Meta class
Root class(meta)的superclass指向Root class(class),也就是NSObject,形成一个回路。
每个Meta class的isa指针都指向Root class (meta)。
instance对象就是通过类alloc出来的对象,每次调用alloc都会产生新的instance对象,分别占据着两块不同的内存。
instance 对象在内存中存储的信息包括
对于Class来说,也就需要一个描述他的类,也就是“类的类”,而meta正是“关于某事自身的某事”的解释,所以MetaClass就因此而生了。
实例的实例方法函数存在类结构体中,类方法函数存在metaclass结构体中,而Objective-C的方法调用(消息)就会根据对象去找isa指针指向的Class对象中的方法列表找到对应的方法
Class 通 class 方法或 runtime 的 object_getClass() 方法得到一个class对象。class对象也就是类对象。
1
2
3
4
5
6
Class objectClass1 = [object1 class ]; Class objectClass3 = [NSObject class ]; Class objectClass4 = object_getClass(object1); Class objectClass5 = object_getClass(object2);
每一个类在内存中有且只有一个class对象。
class对象在内存中存储的信息主要包括:
isa指针
superclass指针
类的属性信息(@property),类的成员变量信息(ivar)
类的对象方法信息(instance method),类的协议信息(protocol)
获取元类对象代码:
1 2 3 4 5 6 7 Class objectMetaClass = object_getClass([NSObject class ]); Class cls = [[NSObject class ] class ]; Class objectClass3 = [NSObject class ]; class_isMetaClass(objectMetaClass) NSLog (@"%p %p %p" , objectMetaClass, objectClass3, cls);
每个类在内存中有且只有一个meta-class对象。 meta-class对象和class对象的内存结构是一样的,但是用途不一样。
元类对象在内存中存储的信息主要包括
isa指针
superclass指针
类的类方法的信息(class method)
meta-class对象和class对象的内存结构是一样的,所以meta-class中也有类的属性信息,类的对象方法信息等成员变量,但是其中的值可能是空的。
此处引用 YY大佬的博客 一个例子:
NyanCat : Cat : NSObject 这样一个继承树,画出图来就是这样子的:
1
2
3
4
5
6
7
8
9
10
11
12
13
14
15
16
17
18
19
#import "NyanCat.h" #import <objc/runtime.h> #import <objc/objc.h> void test() { NyanCat *cat = [[NyanCat alloc] init]; Class cls = object_getClass(cat); class_getName(cls); class_isMetaClass(cls); Class meta = object_getClass(cls); class_getName(meta); class_isMetaClass(meta); Class meta_meta = object_getClass(meta); class_getName(meta_meta); class_isMetaClass(meta_meta); }
由上面的测试代码可知道, 如果对一个 instance(对象)执行 class_isMetaClass获取元类方法,会返回 False , 是因为根据上图,对象的 isa 指向 NyanCat Class 所以不是一个元类Class , 但是对一个 Class 执行这个方法, 就是 True,这 YYModel中 modelContainerPropertyGenericClass 的核心理解
Runtime 中一些API Class objc_getClass(const char *aClassName)
Class object_getClass(id obj)
传入的 obj 可能是 instance 对象、class 对象、meta-class 对象
返回值:
传入 instance 对象,返回 class 对象
传入 class 对象,返回 meta-class 对象
传入 meta-class 对象,返回 NSObject 基类的 meta-class 对象
YYModel 解析 YYModel 是一款 JSON 转 Model 的第三方库,其原理是利用runtime来解析JSON数据,完成赋值操作
YYModel 核心功能在 NSObject+YYModel 文件中,是一个 NSObject 的分类
首先来看看入口地方:
1 2 3 4 5 6 7 8 9 10 11 12 13 14 15 16 + (instancetype )modelWithDictionary:(NSDictionary *)dictionary { if (!dictionary || dictionary == (id )kCFNull) return nil ; if (![dictionary isKindOfClass:[NSDictionary class ]]) return nil ; Class cls = [self class ]; _YYModelMeta *modelMeta = [_YYModelMeta metaWithClass:cls]; if (modelMeta->_hasCustomClassFromDictionary) { cls = [cls modelCustomClassForDictionary:dictionary] ?: cls; } NSObject *one = [cls new]; if ([one modelSetWithDictionary:dictionary]) return one; return nil ; }
通过传入JSON后,在 [_YYModelMeta metaWithClass:cls] 传入对应Model Class 来生成对应属性
1 2 3 4 5 6 7 8 9 10 11 12 13 14 15 16 17 18 19 20 21 22 23 + (instancetype )metaWithClass:(Class)cls { if (!cls) return nil ; static CFMutableDictionaryRef cache; static dispatch_once_t onceToken; static dispatch_semaphore_t lock; dispatch_once (&onceToken, ^{ cache = CFDictionaryCreateMutable (CFAllocatorGetDefault (), 0 , &kCFTypeDictionaryKeyCallBacks, &kCFTypeDictionaryValueCallBacks); lock = dispatch_semaphore_create(1 ); }); dispatch_semaphore_wait(lock, DISPATCH_TIME_FOREVER); _YYModelMeta *meta = CFDictionaryGetValue (cache, (__bridge const void *)(cls)); dispatch_semaphore_signal(lock); if (!meta || meta->_classInfo.needUpdate) { meta = [[_YYModelMeta alloc] initWithClass:cls]; if (meta) { dispatch_semaphore_wait(lock, DISPATCH_TIME_FOREVER); CFDictionarySetValue (cache, (__bridge const void *)(cls), (__bridge const void *)(meta)); dispatch_semaphore_signal(lock); } } return meta; }
此处巧妙的利用缓存思想,将已经解析过Model Class 通过字典保存起来,Key是Class名字.当相同的ModelClass需要用到时候即时返回
1 2 3 4 5 6 7 8 9 - (instancetype )initWithClass:(Class)cls { YYClassInfo *classInfo = [YYClassInfo classInfoWithClass:cls]; if (!classInfo) return nil ; self = [super init]; ... }
先看 _YYModelMeta 的初始化方法,第一行是就是通过传进来的Class,准备通过Runtime 来获取这个Class 的所有属性,里面实现再下面会再说到,这段我们先来了解下这个 _YYModelMeta 工作原理
来到这段代码
1 2 3 4 5 6 7 8 9 10 11 12 13 14 15 16 17 18 19 20 21 22 23 NSDictionary *genericMapper = nil ; if ([cls respondsToSelector:@selector (modelContainerPropertyGenericClass)]) { genericMapper = [(id <YYModel>)cls modelContainerPropertyGenericClass]; if (genericMapper) { NSMutableDictionary *tmp = [NSMutableDictionary new]; [genericMapper enumerateKeysAndObjectsUsingBlock:^(id key, id obj, BOOL *stop) { if (![key isKindOfClass:[NSString class ]]) return ; Class meta = object_getClass(obj); if (!meta) return ; if (class_isMetaClass(meta)) { tmp[key] = obj; } else if ([obj isKindOfClass:[NSString class ]]) { Class cls = NSClassFromString (obj); if (cls) { tmp[key] = cls; } } }]; genericMapper = tmp; } }
根据 .h 的注释
If the property is a container object, such as NSArray/NSSet/NSDictionary,
implements this method and returns a property->class mapper, tells which kind of
object will be add to the array/set/dictionary.
简单来说,就是可以理解为,如果服务器JSON某个字段返回的数组,可以Model Class 中重写这个方法来解析成一个指定Class的数据解析组合
例如,如果已经写好了某个数据模型的Model,此时服务器返回了相应的数据模型JSON,就可以用这个Class来接收,组成一个数组
1 2 3 4 5 6 7 8 9 10 11 12 13 { "samples" :[ { "username" :"jack" , "age" :"20" }, { "username" :"rose" , "age" :"21" } ] }
1 2 3 4 5 6 7 8 9 10 11 12 13 14 15 16 17 18 @interface Person :NSObject @property (nonatomic ,strong )NSString *username;@property (nonatomic ,strong )NSString *age;@end @interface Persons :NSObject @property (nonatomic ,strong )NSArray *persons;@end + (NSDictionary *)modelContainerPropertyGenericClass { return @{ @"persons" : [Person class ], }; }
那么最后解析出来, Persons 这个类中的 persons 数组,含有 Person 的2个模型了
更多具体使用请查看官方介绍,不做更多使用上解析.
回到源码解析上
genericMapper 会遍历Class可能存在的数据,key为属性名字,Obj为对应Class
class_isMetaClass(meta) 会判断传进来的 class 是否元类Class,
到最后,会将数据储存起来方便下面使用。
下面的代码,获取这个类的 BlackList与 WhiteList
顾名思义,解析赋值这个Class属性时候,WhiteList 如果存在键值,则赋值数据时候添加解析,同理黑名单
1 2 3 4 5 6 7 8 9 10 11 12 13 14 15 16 17 18 19 20 21 22 23 24 25 26 27 28 29 30 - (instancetype )initWithClass:(Class)cls { ... while (curClassInfo && curClassInfo.superCls != nil ) { for (YYClassPropertyInfo *propertyInfo in curClassInfo.propertyInfos.allValues) { if (!propertyInfo.name) continue ; if (blacklist && [blacklist containsObject:propertyInfo.name]) continue ; if (whitelist && ![whitelist containsObject:propertyInfo.name]) continue ; _YYModelPropertyMeta *meta = [_YYModelPropertyMeta metaWithClassInfo:classInfo propertyInfo:propertyInfo generic:genericMapper[propertyInfo.name]]; if (!meta || !meta->_name) continue ; if (!meta->_getter || !meta->_setter ) continue ; if (allPropertyMetas[meta->_name]) continue ; allPropertyMetas[meta->_name] = meta; } curClassInfo = curClassInfo.superClassInfo; } ... }
此处我们看到的注释就是,只要这个Class父类还有,就一直解析上去,有没有父类的判断可以根据一开始的前置知识得知,如果RootClass时候,superclass为nil(即解释到时NSObject就不用解析)
解析过程中会用一个字典来记录class符合调节的属性, key是属性名字,value是 __YYModelPropertyMeta
以下就是核心重点代码了,开始解析JSON与赋值给这些符合条件的Class属性
1
2
3
4
5
6
7
if ([cls respondsToSelector:@selector (modelCustomPropertyMapper)]) { NSDictionary *customMapper = [(id <YYModel>)cls modelCustomPropertyMapper]; [customMapper enumerateKeysAndObjectsUsingBlock:^(NSString *propertyName, NSString *mappedToKey, BOOL *stop) { ... }]; ... }
如果这个Class遵循了 YYModel 使用文档中,自定义映射方法,则会便利这个字典,例如在某Model中有 YYModel 的这个方法
1
2
3
4
5
6
7
8
+ (NSDictionary *)modelCustomPropertyMapper { return @{ @"自身可能需要映射的属性" :@"服务器返回的JSON中的数据路径, '.' 来分割路径" , }; }
那么在这个解析过程中, customMapper 会便利这个字典,propertyName是 “自身可能需要映射的属性” ,mappedToKey 是 “服务器返回的JSON中的数据路径”
通过key在上一步所有符合属性的字典中(allPropertyMetas)获取 Value,获取到之后再 (allPropertyMetas) 中删除这个键值
由于 mappedToKey 可能是个有层次解析的数据 (通过 . 分割, 如果没用过 YYModel可以看看官网相关教程),所以会通过
1 NSArray *keyPath = [mappedToKey componentsSeparatedByString:@"." ];
来解析所有路径,存到一个路径数组当中
如果某个路径量为空,则就是用户自己写错了,跳出循环
最后如果存在能解析的路径,则当前Class的属性 _YYModelPropertyMeta 会记录下来
解析完 modelCustomPropertyMapper 中所有 key 之后, allPropertyMetas 剩下的 propertyMeta 赋值与 Class相同属性的名字. 原理如下
假设服务器返回的JSON为
1
2
3
4
5
6
7
8
9
{ "username" :"HelloWorld" , "birth_day" :"1985-0-1" , "age" :"20" , "Family" :{ "Father" :"Jack" , "Mother" :"Rose" } }
Model的属性
1
2
3
4
@property (nonatomic ,strong )NSString *customName;@property (nonatomic ,strong )NSString *age;@property (nonatomic ,strong )NSString *birthDay;@property (nonatomic ,strong )NSString *fatherName;
Model的解析
1
2
3
4
5
6
7
8
9
10
+ (NSDictionary *)modelCustomPropertyMapper { return @{ @"customName" :@"username" , @"birthDay" :@"birth_day" , @"fatherName" :@"Family.Father" , @"foo" :@"Family.Father" , @"bar" :@"Family.Mother" , }; }
由于在解析时
1
2
3
4
5
while (curClassInfo && curClassInfo.superCls != nil ) { for (YYClassPropertyInfo *propertyInfo in curClassInfo.propertyInfos.allValues){ ... } }
不存在的属性是不会添加到 allPropertyMetas 字典中的,所以 foo bar 的key 是不会在 属性字典中
根据上面解析, allPropertyMetas 中应该包括的数据为
1 2 3 4 5 6 allPropertyMetas(NSDictionary ) allPropertyMetas[@"customName" ] = _YYModelPropertyMeta1 allPropertyMetas[@"age" ] = _YYModelPropertyMeta2 allPropertyMetas[@"birthDay" ] = _YYModelPropertyMeta3 allPropertyMetas[@"fatherName" ] = _YYModelPropertyMeta4
在 customMapper enumerateKeysAndObjectsUsingBlock 便利 Model 的映射Key时候,customName , birthDay , fatherName , foo , bar 会寻找在 allPropertyMetas 中的位置 (此处没有 age属性,)
因为 foo 与 bar 不是 Class 的属性,循环会自动跳过, 剩下的3个会找到相应的 YYModelPropertyMeta 并且赋值 keyPath 到属性上(keyPath就是属性路径, 如 :@”Family.Father” )
那么在 customMapper enumerateKeysAndObjectsUsingBlock 后, allPropertyMetas 会剩下 age 属性, _YYModelPropertyMeta2 的 key名字自然就是 age 的属性名字了. 因为并不需要做映射与层级解析.
剩下的就是一些数据封装了
1 2 3 4 5 6 7 8 _classInfo = classInfo; _keyMappedCount = _allPropertyMetas.count; _nsType = YYClassGetNSType(cls); _hasCustomWillTransformFromDictionary = ([cls instancesRespondToSelector:@selector (modelCustomWillTransformFromDictionary:)]); _hasCustomTransformFromDictionary = ([cls instancesRespondToSelector:@selector (modelCustomTransformFromDictionary:)]); _hasCustomTransformToDictionary = ([cls instancesRespondToSelector:@selector (modelCustomTransformToDictionary:)]); _hasCustomClassFromDictionary = ([cls respondsToSelector:@selector (modelCustomClassForDictionary:)]);
_nsType = YYClassGetNSType(cls); 值得一提,这个是判断本Class是个什么类型的Class。
YYClassInfo(Class所有原始属性的封装) 回到上面留下的问题 YYClassInfo 解析
YYClassInfo 出现在 _YYModelMeta 初始化时候
1
2
3
4
5
@implementation _YYModelMeta - (instancetype )initWithClass:(Class)cls { YYClassInfo *classInfo = [YYClassInfo classInfoWithClass:cls]; ... }
首先来看看如何生成
1 2 3 4 5 6 7 8 9 10 11 12 13 14 15 16 - (instancetype )initWithClass:(Class)cls { if (!cls) return nil ; self = [super init]; _cls = cls; _superCls = class_getSuperclass(cls); _isMeta = class_isMetaClass(cls); if (!_isMeta) { _metaCls = objc_getMetaClass(class_getName(cls)); } _name = NSStringFromClass (cls); [self _update]; _superClassInfo = [self .class classInfoWithClass:_superCls]; return self ; }
就是一些基本属性赋值,获得SuperClass , Cls Name之类的
1
2
3
4
5
6
7
8
9
10
11
12
13
14
15
16
17
18
19
20
21
22
23
24
25
26
27
28
29
30
31
32
33
34
35
36
37
38
39
40
41
42
43
44
45
46
47
- (void )_update { _ivarInfos = nil ; _methodInfos = nil ; _propertyInfos = nil ; Class cls = self .cls; unsigned int methodCount = 0 ; Method *methods = class_copyMethodList(cls, &methodCount); if (methods) { NSMutableDictionary *methodInfos = [NSMutableDictionary new]; _methodInfos = methodInfos; for (unsigned int i = 0 ; i < methodCount; i++) { YYClassMethodInfo *info = [[YYClassMethodInfo alloc] initWithMethod:methods[i]]; if (info.name) methodInfos[info.name] = info; } free(methods); } unsigned int propertyCount = 0 ; objc_property_t *properties = class_copyPropertyList(cls, &propertyCount); if (properties) { NSMutableDictionary *propertyInfos = [NSMutableDictionary new]; _propertyInfos = propertyInfos; for (unsigned int i = 0 ; i < propertyCount; i++) { YYClassPropertyInfo *info = [[YYClassPropertyInfo alloc] initWithProperty:properties[i]]; if (info.name) propertyInfos[info.name] = info; } free(properties); } unsigned int ivarCount = 0 ; Ivar *ivars = class_copyIvarList(cls, &ivarCount); if (ivars) { NSMutableDictionary *ivarInfos = [NSMutableDictionary new]; _ivarInfos = ivarInfos; for (unsigned int i = 0 ; i < ivarCount; i++) { YYClassIvarInfo *info = [[YYClassIvarInfo alloc] initWithIvar:ivars[i]]; if (info.name) ivarInfos[info.name] = info; } free(ivars); } if (!_ivarInfos) _ivarInfos = @{}; if (!_methodInfos) _methodInfos = @{}; if (!_propertyInfos) _propertyInfos = @{}; _needUpdate = NO ; }
再 Update 方法中,获得Cls 的 Property,Ivar,Method , 然后分别封装
值得一提的是 Property 封装过程中会根据 TypeEncoding 来获得对象属性的 关键词属性,从而知道有没有 getter setter方法,方便后面的设置
关于 TypeEncoding 也是个很长的课题,这里不做展开解释,可以自行查看苹果官方文档
Type Encodings
为什么叫 用于对原始Class封装YYClassInfo的再封装呢?
在
1
2
3
4
5
6
7
8
9
while (curClassInfo && curClassInfo.superCls != nil ) { for (YYClassPropertyInfo *propertyInfo in curClassInfo.propertyInfos.allValues) { ... _YYModelPropertyMeta *meta = [_YYModelPropertyMeta metaWithClassInfo:classInfo propertyInfo:propertyInfo generic:genericMapper[propertyInfo.name]]; ... } }
会遍历本Model Class所有属性,通过传入当前Cls , 属性封装对象 , generic mapper中可能存在的映射变量(在上文有介绍,忘记可以划回去看看) 来初始化一个 _YYModelPropertyMeta 对象
在 _YYModelPropertyMeta中,再添加一些对属性的描述
例如添加是否有 getter ,setter的标记位
1
2
3
4
5
6
7
8
9
10
if (propertyInfo.getter) { if ([classInfo.cls instancesRespondToSelector:propertyInfo.getter]) { meta->_getter = propertyInfo.getter; } } if (propertyInfo.setter) { if ([classInfo.cls instancesRespondToSelector:propertyInfo.setter]) { meta->_setter = propertyInfo.setter; } }
JSON赋值 通过前面的使用Runtime对本Model Class 的属性的创建,最后到了这步,就是简单的获取属性的 getter 赋值问题了
1 2 3 4 5 6 7 8 9 10 11 12 - (BOOL )modelSetWithDictionary:(NSDictionary *)dic { ... if (modelMeta->_keyPathPropertyMetas) { CFArrayApplyFunction ((CFArrayRef )modelMeta->_keyPathPropertyMetas, CFRangeMake (0 , CFArrayGetCount ((CFArrayRef )modelMeta->_keyPathPropertyMetas)), ModelSetWithPropertyMetaArrayFunction, &context); } ... }
这个方法中,使用底层的CF方法来做赋值,提升效率
先看下这个函数的原型
1 void CFArrayApplyFunction (CFArrayRef theArray, CFRange range, CFArrayApplierFunction applier, void *context);
CFArrayApplyFunction会为数组内指定范围的每个元素调用一次指定的方法。
其中的context是个结构体, modelMeta是上面封装的Cls信息,model是self,dic是服务器json
1
2
3
4
5
typedef struct { void *modelMeta; void *model; void *dictionary; } ModelSetContext;
所以上面的 CF 方法会根据这个Model的 键值映射对 的数量来让执行多少次 ModelSetWithPropertyMetaArrayFunction 方法
1 2 3 4 5 6 7 8 9 10 11 12 13 14 15 16 17 18 19 20 21 22 23 24 25 26 27 28 29 30 31 32 33 34 35 36 37 38 static void ModelSetWithPropertyMetaArrayFunction(const void *_propertyMeta, void *_context) { ModelSetContext *context = _context; __unsafe_unretained NSDictionary *dictionary = (__bridge NSDictionary *)(context->dictionary); __unsafe_unretained _YYModelPropertyMeta *propertyMeta = (__bridge _YYModelPropertyMeta *)(_propertyMeta); if (!propertyMeta->_setter ) return ; id value = nil ; if (propertyMeta->_mappedToKeyArray) { value = YYValueForMultiKeys(dictionary, propertyMeta->_mappedToKeyArray); } else if (propertyMeta->_mappedToKeyPath) { value = YYValueForKeyPath(dictionary, propertyMeta->_mappedToKeyPath); } else { value = [dictionary objectForKey:propertyMeta->_mappedToKey]; } if (value) { __unsafe_unretained id model = (__bridge id )(context->model); ModelSetValueForProperty(model, value, propertyMeta); } } static force_inline id YYValueForKeyPath(__unsafe_unretained NSDictionary *dic, __unsafe_unretained NSArray *keyPaths) { id value = nil ; for (NSUInteger i = 0 , max = keyPaths.count; i < max; i++) { value = dic[keyPaths[i]]; if (i + 1 < max) { if ([value isKindOfClass:[NSDictionary class ]]) { dic = value; } else { return nil ; } } } return value; }
由上面的循环方法得知,根据之前对Cls 的keypath的解析,直接从 JSON来读取 对应层次的位置,如果数值不为空,则通过ModelSetValueForProperty 方法来设置属性的值
1 2 3 4 5 6 static void ModelSetValueForProperty(__unsafe_unretained id model, __unsafe_unretained id value, __unsafe_unretained _YYModelPropertyMeta *meta) { ... }
方法内通过之前获得的属性是否存在 getter 与 typeCoding 的类型,通过 objc_msgSend 来设置属性
至此,YYModel 代码就解析完了
总结 YYModel 内部对 Objc_class 的封装做到了极致,根据自身属性来迅速赋值服务器JSON
流程:
对本Class,通过Runtime来建立所有对象属性方法的建立封装
读取自身Model的键值映射,做到层级分层
根据层级分层来读取服务器JSON的层级,达到赋值
Reference:
Objective-C 中的类和对象 iOS class深入理解: 实例对象、类对象、元类和isa指针 class_copyPropertyList与class_copyIvarList区别